To begin with, you can follow me on Bluesky. (Haha, Surprise!)

Nah, it is more than that. I want you to see the final result.
See how my handle is NOT bsky.social below my standing out Asian name?
In fact, look at the link on the page you are reading now. It is intenca.com too! Why? Because a Bluesky handle is a domain name! No idea what a domain is? No problem, that’s why I’m here.
In this article, I will guide you through steps-by-steps how to change your Bluesky handle!
Remember, the Bluesky handle IS NOT your display name. See my name is Hong C.T. , but my handle is intenca.com. So, the profile link I share would be https://bsky.app/profile/intenca.com. Just keep that in mind.
Pre-requisite
- $10~$20 in your bank account
- Some basic computer literacy
- Able to follow a basic tutorial
Sounds like you? Well, let’s begin!
1. Pick A Handle You Want
How about handsome.dude? Sadly, it can’t be done. Remember a Bluesky handle is a domain? Therefore, you can only use a domain ends with something like .com, .co, .org, .net, etc. There are plenty of interesting domain (Check out this Wikipedia to know more) and more (Wikipedia page for country code domain). So, you can create a handle like handso.me , because .me is the country code for Montenegro. Or, how about a more visual one like gro.org. (Likely taken.) You’ll need to be real creative here!
Just remember, before you decided your handle, you need to check if the domain is available to purchase first! Also, a rarely seen ending domain like .pharmacy is very unlikely to be purchased or might cost you a lot to buy it. Think anything with a .com, it would just cost about $10/year. But if it is say happy.accountants it could cost about $90/year!
2. Check If The Handle (Domain) Is Available
You can use the following tools to check if your domain is available:
Notice how rare domains cost a lot more? Comparing to a regular .com domain is just USD $10 / AUD $15 for a year.

3. Pick A Domain Registration Provider
Before buying a domain, you’ll need to pick a domain registration provider. It basically means picking an agent to buy the domain you want. I prefer Cloudflare because they are the largest domain service provider, as well as offering a lot of great domain features that are not relevant in this tutorial, so there is that. All you need to know is that they are reputable and offer a relatively cheap price for domain registration service in the industry. (Looking at you, GoDaddy.)
However, if you want to use an interesting domain other than the common ones, Cloudflare might not have it covered. You will need to search for another provider to buy it. Like from the picture above, it is Squarespace who is able to offer such domains. To continue, we will assume you are using Cloudflare as the provider as it is the mainstream. But, if you are using other domain providers, don’t worry, the procedures are pretty much the same!
4. Sign Up On The Domain Provider And Buy The Domain!
Easy. Once you have decided on a handle; Checked it is available; Made sure it is available on this domain provider; You just sign up, enter the domain you want, type in your credit or debit card detail, buy it! I’ll assume you can do this yourself as it is pretty much straight forward.
You can read more about it here and here.
5. Use The Domain As Your Bluesky Handle
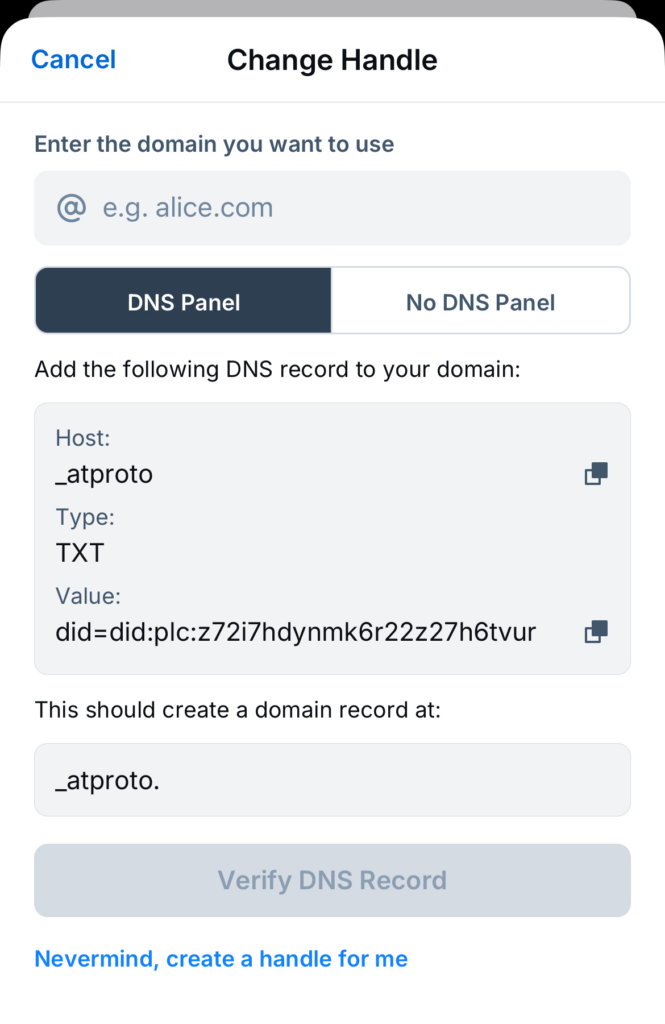
Now is the time for your handle to be seen! Let’s assume you’ve already successfully bought the domain (handle) you want. Now, all you need to do is Go To Your Bluesky App > Settings > Handle > Press “I have my own domain”.
You’ll then see something like this:

- Just type in the domain you’ve just bought.
- Login to Cloudflare
- Click on your domain like the one shown here

4. Go to DNS tab on the left, then press the “add record” button like so

5. Now enter the information provided from your Bluesky app popup. For Type choose TXT; Name type in: _atproto; Content: Copy & Paste the “Value” from Bluesky. It should look like this:

6. When you’re done, simply hit “Save”. Then, wait for a minute.
7. Go back to your Bluesky app, tap on “Verify DNS Record”.
*Having trouble? You can also read the official Bluesky article here.
6. That’s It! Enjoy!
#Last note
To keep a domain, you’ll have to renew it once a year or as often as you prefer.

Leave a Reply